Foundation Rings
Crochet Foundation Rings are the start to every project worked in rounds. It will be important to be familiar with how to create them.
When we crocheted in rows, we started with a foundation chain. When we crochet in rounds we need a ring as our foundation. There are three main ways to create these, a chain ring, a yarn ring and a magic ring.
As with everything in crochet, you'll find the one that works the best for you. Practice each of them and see which one fits you and your style of crocheting.
Chain Ring
|
1 - Make the required number of chains. Your pattern will tell you how many. For our ring we’ll chain 5. The more chains that are made the bigger the hole in the center of your foundation ring will be. |
|
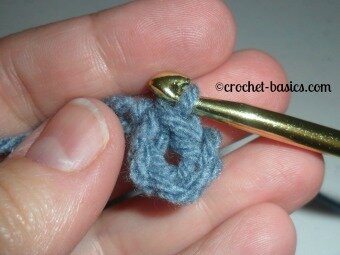
2 - Now we’re going to join the chain with a slip stitch. Insert the hook into the first chain that was made. 3 - Yo and pull through both loops on the hook. |
 |
|
You now have your chain foundation ring. Open out the ring carefully with your finger. This will help you clearly see the center. You will be working your stitches into this center. |
Yarn Foundation Ring
|
1 – Wind the yarn around your left index finger several times. Be sure to hold the yarn end between your finger and thumb. |
|
2 – Carefully slide the yarn ring off your finger and onto your crochet hook. I prefer to slide my hook under the ring while it’s still on my finger first. Then carefully slide it off. It can be a tight squeeze, but I seem to have a little bit better luck with this technique. |
|
3 – Yo and pull through the center of the ring. |
Magic Ring
A magic ring is a little more difficult to make, but with practice it may become your favorite foundation ring.
The magic ring is great because it lets you tighten up your circle as much or as little as you want . . . after you've worked your first round into it.
Sounds good, right? Well, it is and that’s why so many people love this ring.
There are a couple of ways to work this. So don't get worried if you see it worked a different way.
I'll walk you through the first round so you can see how it works.
|
1 – Start by making a “J” with the end of your yarn. I've seen this worked with a backwards "J" also. It works the same, but just flipped. |
|
2 – Take the end of your yarn and cross it BEHIND the yarn coming from the skein. |
|
This is where it can get a little tricky 3 –Let the yarn from the skein fall behind the loop. If it helps you, hold the yarn between your thumb and fore finger where they cross. I prefer not to do it that way. |
|
4 –Insert your hook into the ring and pick up the yarn that you let fall. Pull it through the ring. (When I do this it reminds me of a pretzel. If that helps you, then use it, if not, that’s ok.) |
|
5 – Pull the loop all the way through and up to the top of the ring. This definitely takes some practice. So don’t worry if you have to go through it a few times. Once you pull the loop up to the top of the ring, you can let go of the yarn where the two strand were crossed. (If you were holding it)
|
|
6 – Chain 1 for sc or hdc, 2 for dc. If your using a pattern, it will tell you how many to chain. You can see in the picture that your yarn tail is wrapped around the ring several times. You can unwrap it if you want, it won't affect your ring. |
|
7 – Work the number of stitches into the ring that the pattern tells you to. |
|
Now for the fun part! 8 – Pull the yarn end to close your circle. You can see why so many people use this ring . . . because it allows them to completely close the circle with ease. |
Most patterns will tell you which ring to start with. So, it will be helpful to understand all the techniques.
As you get more familiar with patterns and with the foundation rings you’ll learn to interchange them when you want to.
You have the foundation rings down, now, let's crochet a circle.
Home › How to Crochet › Foundation Rings©Copyright 2013-2018
All rights reserved.
Nothing on this page is public domain.