Crochet Seams
Many crochet projects are made in pieces and then sewn together. That's why crochet seams are so important!
There are several different ways to work seams. It’s best to learn all the ways, but any of them can be used on any seam. You don't even have to use the same kind of seam throughout your piece. You can use different ones in the same garment.
Here's a couple of general rules to follow.
- Side seams should be worked from the bottom (hem) up to the armhole.
- Shoulder seams should be worked from the neck opening out.
The ideal crochet seams will lay flat and be invisible.
Give yourself plenty of time to work on your seams. Being rushed can lead to sloppy seams and who wants that after all the work you put into making it.
Weaving From the Right Side
This is a great way to work your seams. You can see exactly what your seam will look like while you're working it. This is especially helpful when you have stripes or patterns to match up.
In the pictures, I’ve used a different color of thread so that you can see how to work the seam. In your projects you’ll want to use the same color of yarn so that your seams will be hidden.
1. Lay the two pieces out on a flat surface. Line up the pieces right next to each other and pin them every 2-3 inches.
If you are working with stripes or patterns, be sure to pin them where they need to line up.
2. Use a blunt tapestry needle with about a 24 inch tail of yarn. Bring the needle up through the bottom stitch on one side and then through the bottom chain directly across from the first stitch.
3. Bring the needle up again on the same side (about ½ an inch or so), then over again through the opposite side where the stitches line up.
Pull the yarn tight every few stitches – just enough to keep the edges together, but not enough to make the seam pucker or bunch.
4. Continue until the end of the seam.
5. Weave in the ends on the wrong side.
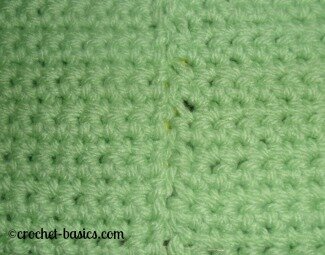
Here's the seam from the right side. You can see how clean it is and that the yarn I used is pretty much completely hidden from the front.
Single Crochet
Single crochet seams can make nice, decorative edges on seams when they're worked on the right side. However, it can be a bulky internal seam. So, this is usually worked on the right side.
1. Pin the two pieces, wrong sides together.
2. Bring up a loop at the beginning of the seam through both pieces.
3. Yo and bring through loop.
4. Insert the hook into the next opening and pull up loop.
5. Yo and pull through both loops.
6. Continue sc to the end of the seam.
7. Fasten off and weave in the ends on the wrong side.
|
Wrong side of seam. |
Right side of seam. |
Slip Stitch
1. Hold the crochet pieces together with right sides facing in. Work your stitches from right to left.
2. Insert the hook through the bottom chain of each side.
3. Yo at the back of your work and pull up a loop.
4. Insert hook into the next stitch of both pieces.
5. Yo (at the back) and pull the yarn through the 2 pieces and through the loop on the hook.
6. Continue until the end of the seam. Be sure to work in a straight line.
7. Fasten off and weave in both ends.
|
Seam laying flat from the back. |
Seam laying flat from the front. |
Here is the slip stitch crochet seam worked with the same color of yarn. You can see it's quite well hidden.
|
Back |
Front |
Whip Stitch
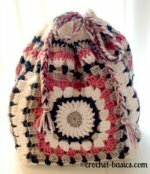
The whip stitch is a great stitch for straight edged crochet seams such as granny squares.
This stitch is worked with a tapestry needle and about 24" of yarn.
1. With right sides together and crocheted stitches matching, insert the needle through the loops on both pieces, front to back.
2. Start at the front again for your next stitch.
Work the all stitches front to back. This creates the “whip” stitch.
|
3. Continue to the end of the seam. |
4. Weave in ends in the back of your work. |
This seam can also be worked laying the pieces side by side.
|
Start the seam on one side and match your stitches on the second side. |
Always start and end your stitches on the same side. If you start on the right side (which I did) always start your stitches on the right and end them on the left. |
Try to keep your stitches evenly spaced. This will give you a much nicer finish.
Here are the same granny squares worked with orange yarn. You can see how well the seam blends in with the stitches and has a nice, clean look.
Mattress Stitch
This is a strong seam stitch that is almost invisible. You’ll be using a tapestry needle and start with about 24” of yarn.
1. Lay the crochet pieces on a flat surface with the right sides facing up. Pin them together if that helps.
2. Take a stitch along one edge and then another exactly opposite of it on the second piece.
3. Bring the need up about 1/2 inch on the same side.
4. Take another stitch on the first side, starting in the same place the last stitch ended.
5. Continue this along the entire seam.
Work a few stitches and then pull the seam tight and then work a few more.
6. Weave in the ends into the back side of your work.
|
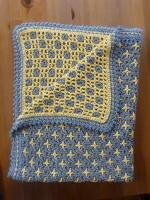
This is the front side of the seam with the yellow yarn. It's very well hidden. |
Finish learning all the Crochet Essentials. Go from Crochet Seams to How to Crochet a Circle.
Crochet-Basics Buzz
Sign up for our newsletter and you'll be up to date on all the latest buzz.
Sign Me Up
Recent Articles
-
Interlocking Crochet
Apr 25, 17 07:58 PM
The pattern is reversible and appears different on both sides.
-
Crochet Star
Feb 07, 17 04:50 PM

Crochet stars are fun for any time of year. Here’s a walk-through of my favorites.
-
Crochet Granny Square
Feb 06, 17 04:46 PM
Everyone loves crochet granny squares! Learn how to create them with these step-by-step instructions.
©Copyright 2013-2016
All rights reserved.
Nothing on this page is public domain.